Sticker Mode
Sticker mode can generate multiple expression stickers at once and automatically split them into individual images.
Basic Usage
Here's how to generate a 3×3 (9 total) Shiba Inu office sticker set:
Step 1: Select Mode and Enter Prompt
- Select "Sticker" mode
- In the "Prompt Description" input, describe your character:
A fluffy orange Shiba Inu with a round face, cute Q-styleTip
Focus on describing the character's appearance and style. Context, composition, and expression details will be automatically added to the prompt through the options below.
Step 2: Configure Options
Layout
- Rows: 3
- Cols: 3
- Preview will show "9 stickers total"
Usage Context
- Select "Boss Replies" (suitable for office scenarios)
Composition - Camera Angle
- Check "Headshot", "Half-body", "Full-body" (multi-select for more variety)
Composition - Expression Intensity
- Choose "Natural", "Exaggerated", or "Over-the-top" based on preference
Step 3: Generate Sticker Sheet
- Click the "Generate" button
- Wait for AI to generate the complete sticker sheet
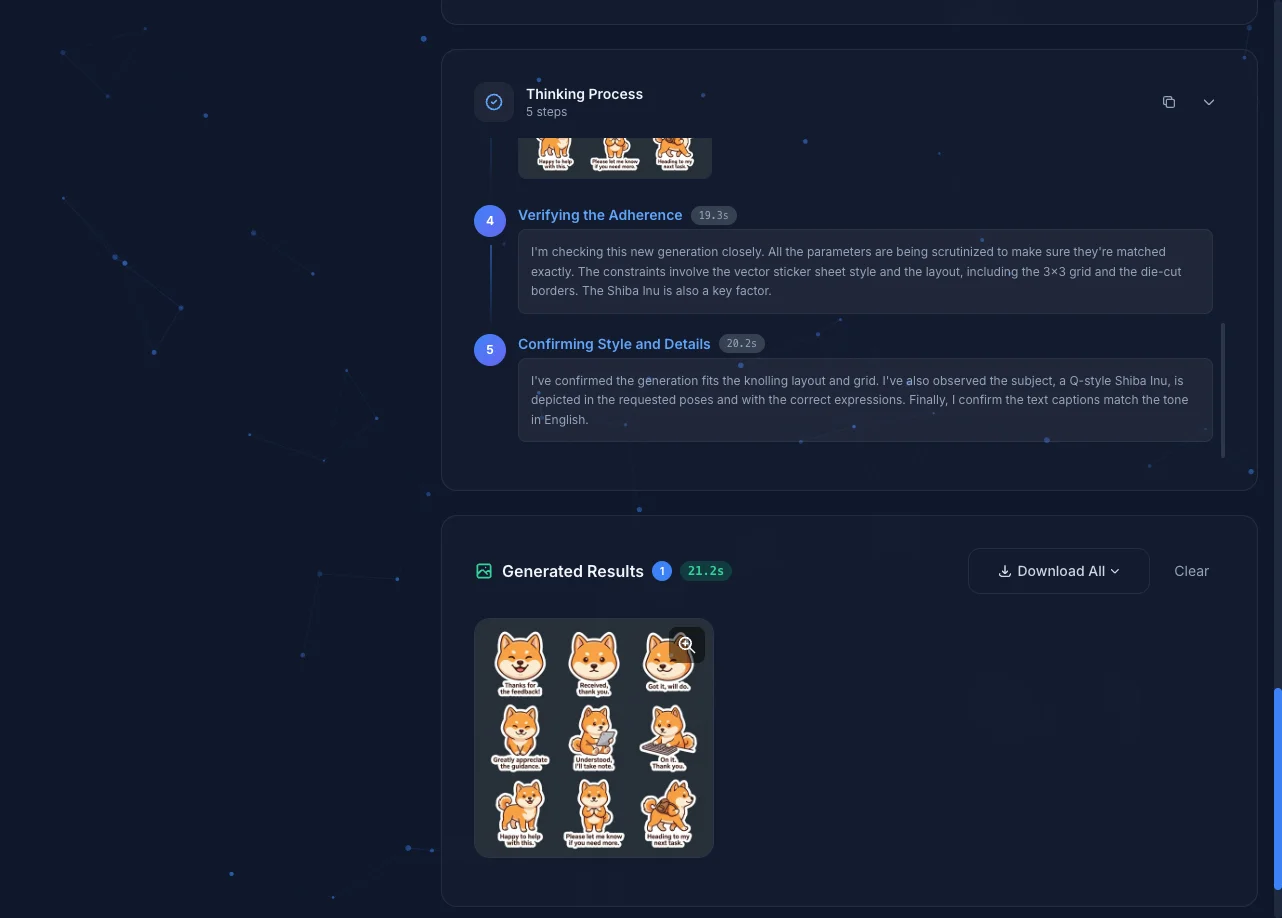
Step 4: Crop Stickers
- Click the generated image to open the lightbox
- Click the "Crop" button in the top-right corner

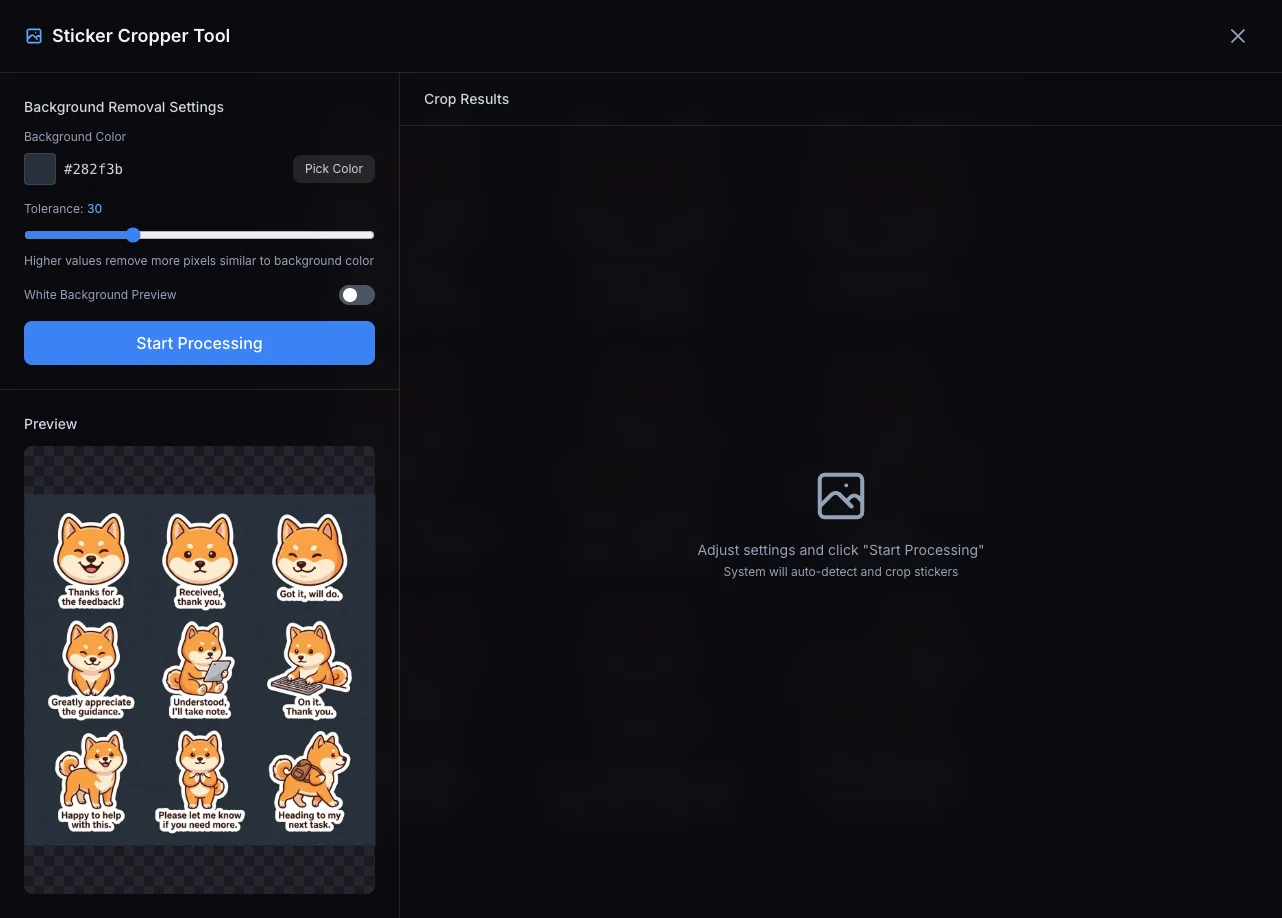
- In the crop tool, adjust the background removal settings:
- Background Color: The system auto-detects the background color. If the detection is incorrect or the background removal looks off, click "Pick Color" to manually sample the correct color from the image
- Tolerance: Adjust the value to control background removal range
- Edge Erosion: Choose 0–3px erosion to remove residual edge pixels after background removal (default: 0px, no erosion)
- White Background Preview: We recommend enabling this to ensure clean sticker edges
- Click "Start Processing" and the system will auto-detect and split into individual stickers
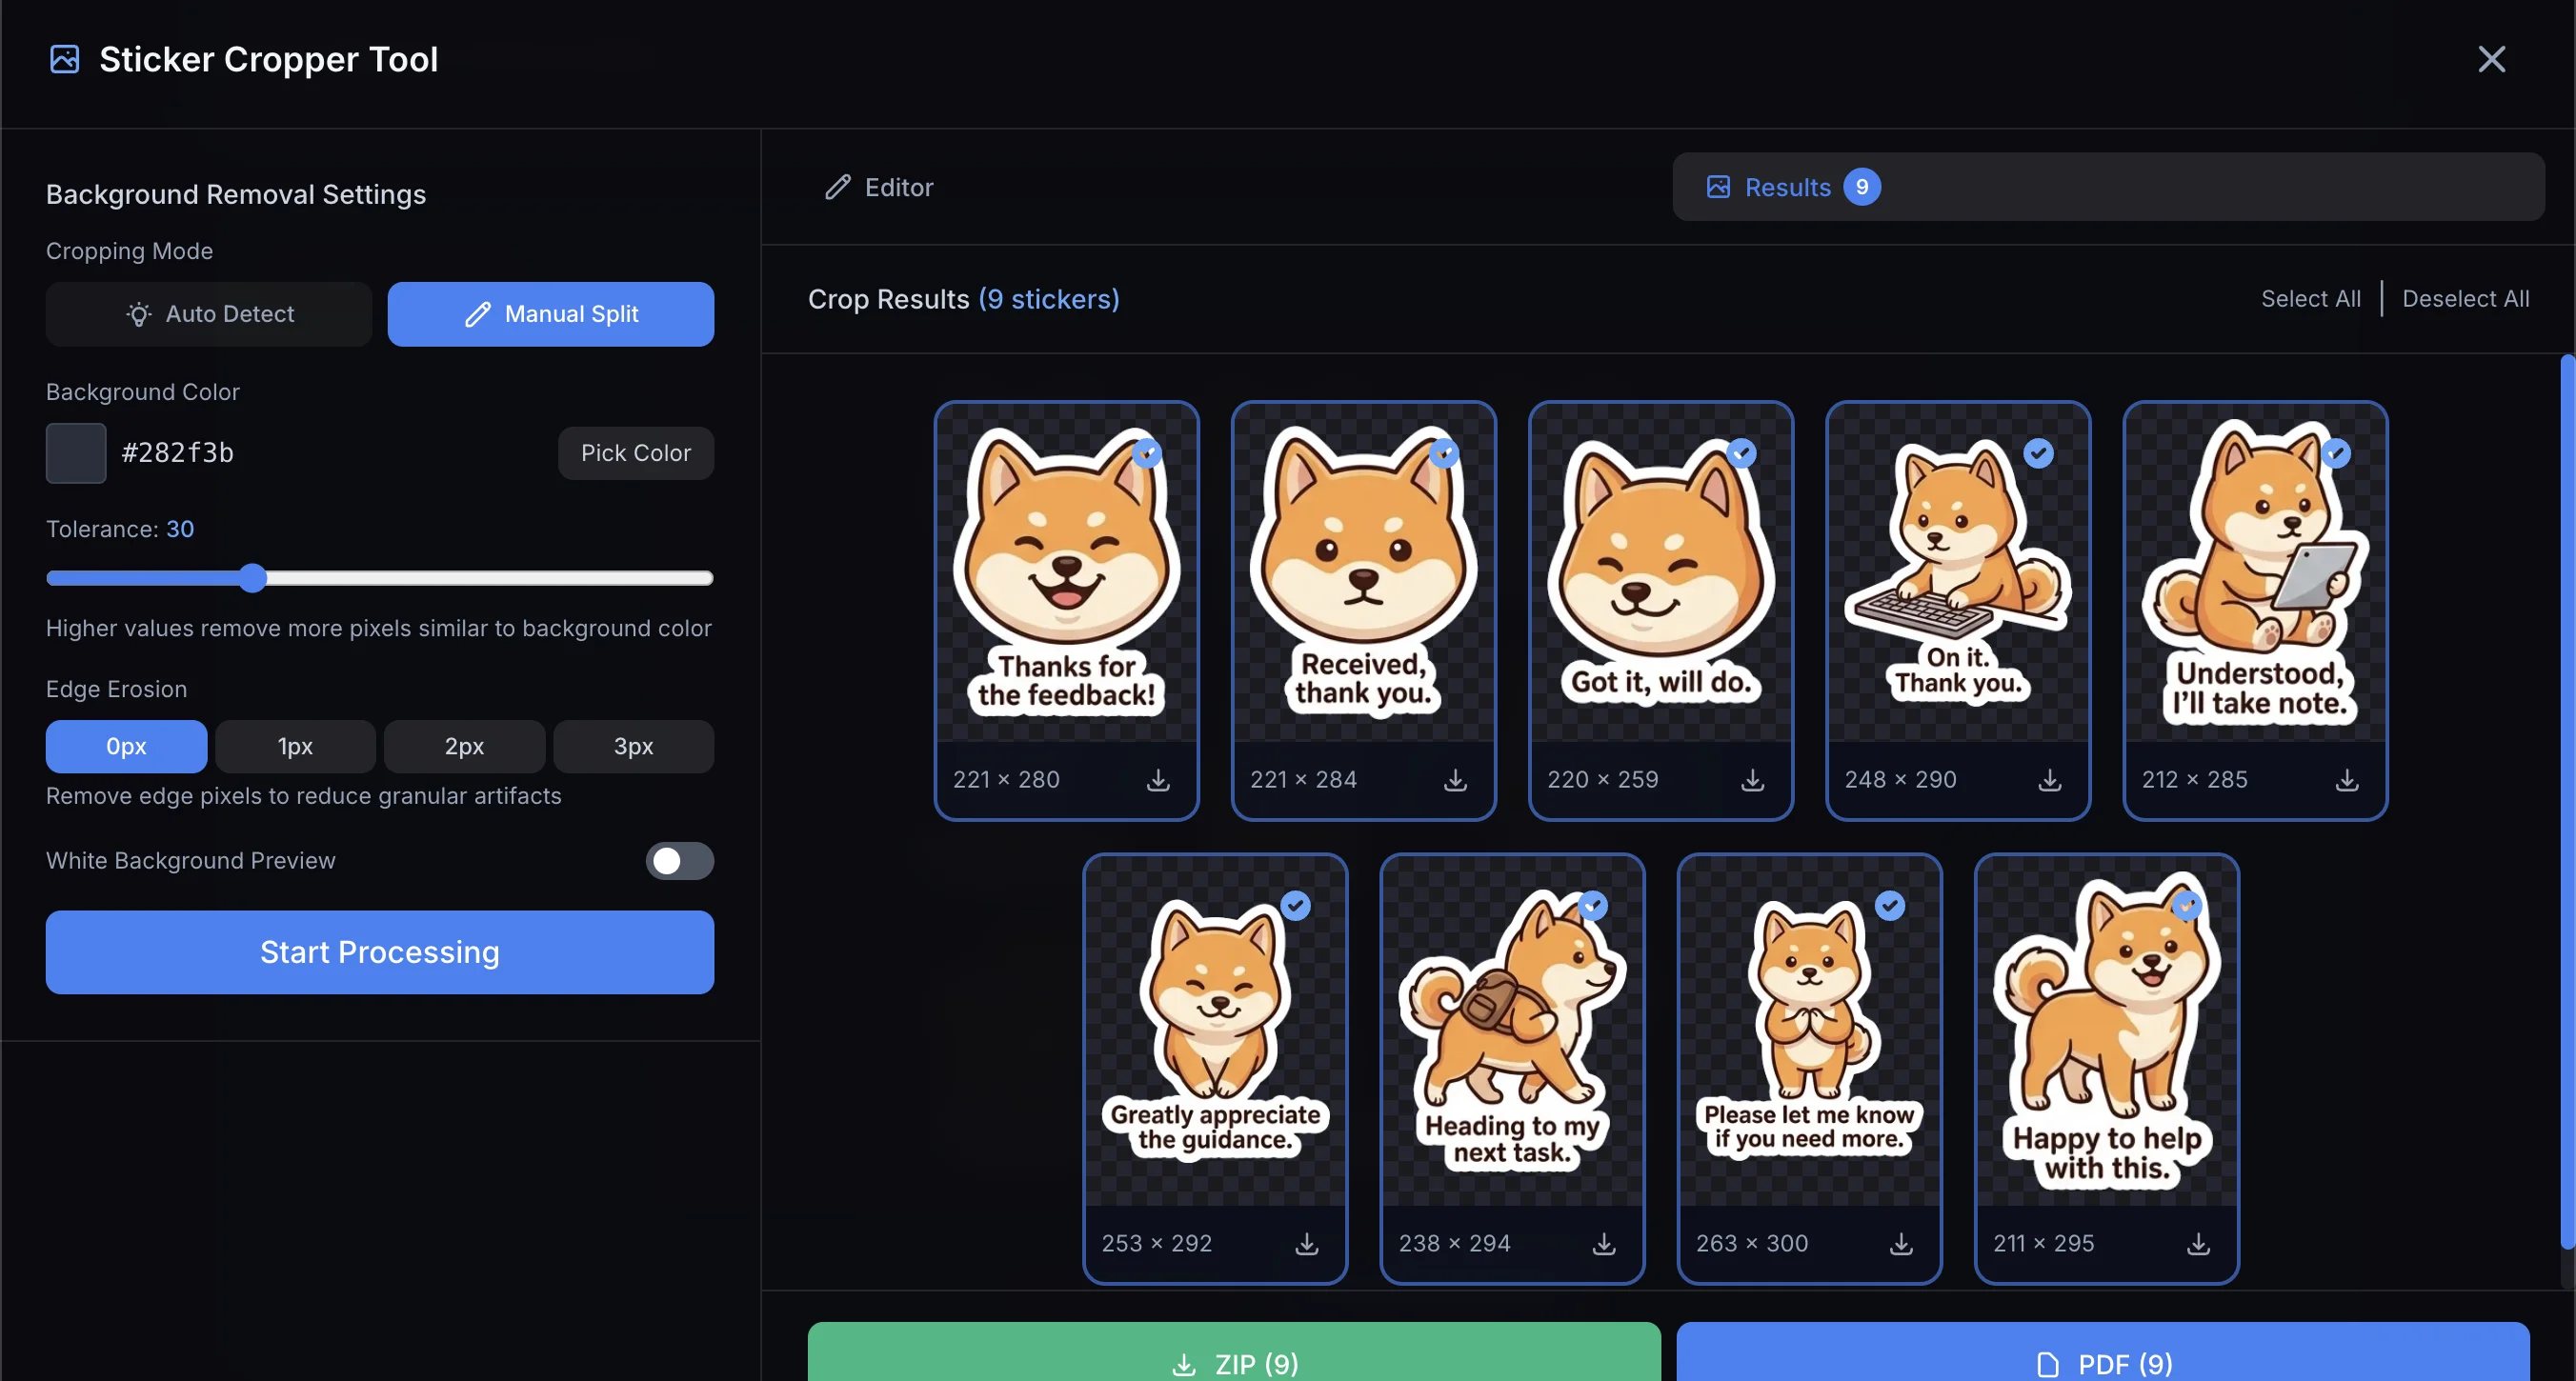
Step 5: Download and Edit
After cropping, the right panel displays all split stickers (9 stickers in this example).
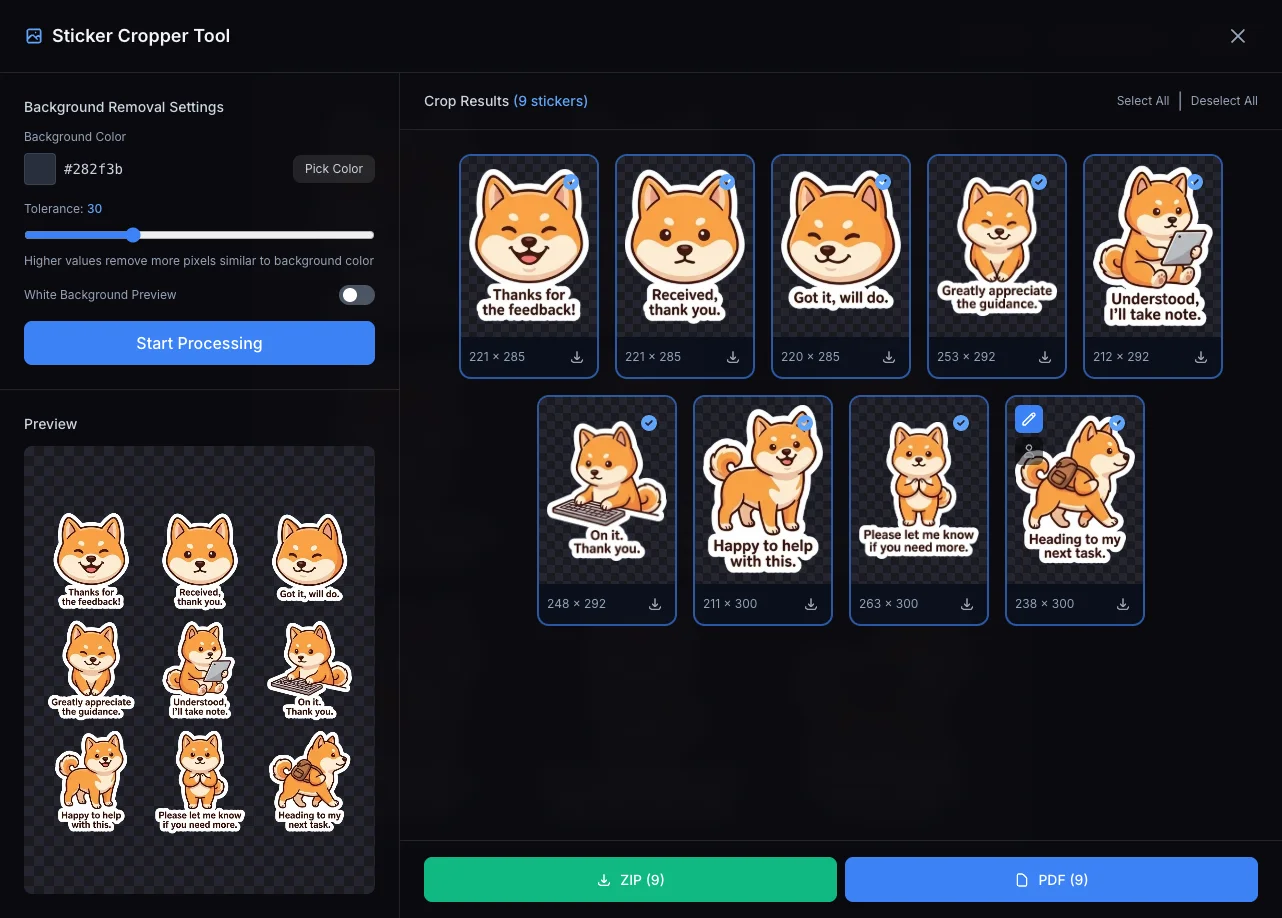
Download Options:
- Download as PDF
- Download as ZIP archive
Individual Sticker Editing:
In the crop results, click the "Edit" button (pencil icon) on the top-left corner of any sticker to open the background removal tool:
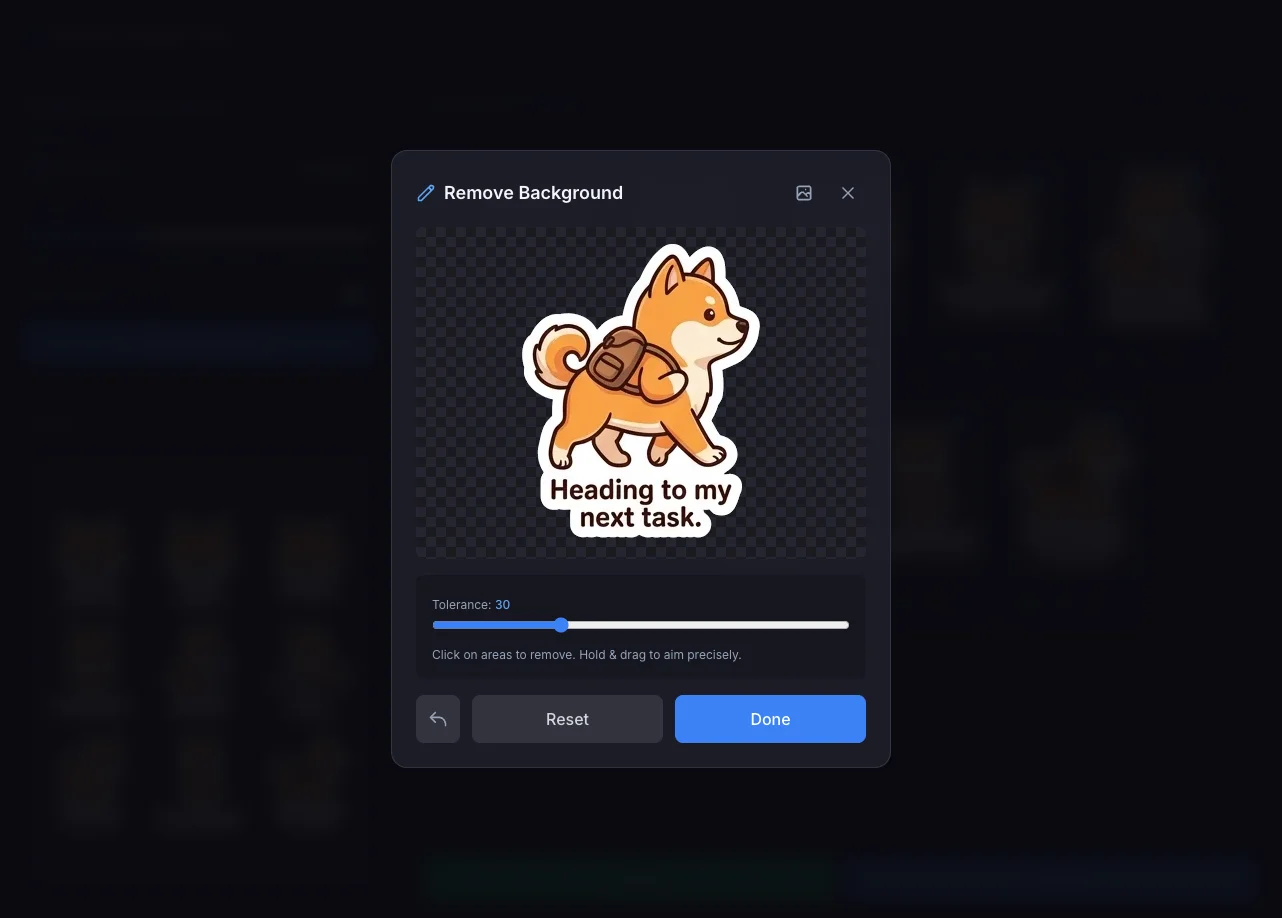
- Click to remove: Click directly on areas you want to remove
- Drag to aim: Hold and drag for more precise selection
- Tolerance: Adjust the value to control the removal range
- Undo: Click the undo button on the bottom-left to revert the last action
If your sticker has disconnected background areas (e.g., gaps enclosed by the character's arms), use this tool to remove them and convert to transparent background.
Character Extraction:
If you're happy with the character design and want future generations to maintain the same appearance, use the "Extract Character" feature to save it. See Character Library for details.
Sticker Options Explained
Quality
Set the output image resolution: 1K, 2K, 4K.
Aspect Ratio
Set the sticker sheet image ratio: 1:1, 3:4, 4:3, 9:16, 16:9.
Layout
Set the rows and columns for the sticker sheet. Recommended total of 4-9 stickers; too many may result in crowded images with insufficient detail.
Style
Choose from preset styles or enter custom style descriptions:
- Preset styles: Photorealistic, Watercolor, Oil Painting, Sketch, Pixel Art, Anime, Pixar 3D, Vintage, Modern, Abstract, Minimalist
- Custom style: Enter your desired style description in the input field
Usage Context
Preset contexts affect the expressions and action styles AI generates:
- Chat Replies: Everyday conversation expressions
- Group Chat: Reaction stickers for group chats
- Boss Replies: Office scenarios, workplace communication
- Couples: Sweet, cute expressions
- Custom: Enter your own specific usage context
Text Options
Configure text tone (Formal, Polite, Friendly, Sarcastic) and language (Chinese, English, Japanese) for sticker text.
Composition
- Camera Angle: Headshot, Half-body, Full-body - multi-select for variety
- Expression Intensity: Natural, Exaggerated, Over-the-top
Sticker Grid Cutter
If you already have grid sticker sheets from other platforms (e.g., ChatGPT, Midjourney), you can upload and crop them directly using the "Sticker Grid Cutter" tool without generating through Mediator.
Two Entry Points
The sticker cropping feature has two entry points for different scenarios:
| Entry | Location | Use Case |
|---|---|---|
| Lightbox Crop | Open a Mediator-generated image → Lightbox → Click "Crop" button | Crop sticker sheets generated by Mediator |
| Grid Cutter Tool | Entry card on the Sticker mode main screen, or visit /sticker-grid-cutter directly | Upload externally sourced grid sticker images |
Both use the same cropping engine (background removal → edge erosion → region detection → auto splitting). The only difference is the image source: one loads from Mediator history, the other uploads from your device.
Auto Splitting
After generation, Mediator automatically splits the sticker sheet into individual stickers:
- AI generates the complete sticker sheet
- Client-side image analysis
- BFS flood fill algorithm (8-connected) removes background
- Apply edge erosion (if configured)
- Detect regions and auto crop
Tip
If auto splitting doesn't work well, you can adjust splitting parameters or manually select regions in the lightbox.
Edge Erosion
After background removal, sticker edges may have a ring of faint "granular" residual pixels. Edge Erosion removes these boundary pixels layer by layer:
| Setting | Effect |
|---|---|
| 0px | No erosion (default) |
| 1px | Light cleanup, suitable for most cases |
| 2px | Moderate erosion, edges noticeably shrink inward |
| 3px | Heavy erosion, for images with severe background residue |
Note
Erosion shrinks the overall sticker inward. High values may clip fine details (e.g., hair strands, whiskers). Start with 1px and adjust as needed.
Manual Crop Mode
When auto splitting fails to correctly distinguish stickers (e.g., stickers are too close together, overlapping elements), you can switch to "Manual Split" mode to draw separator lines and define crop regions yourself.
How to Use
- In the crop tool, switch "Cropping Mode" from "Auto Detect" to "Manual Split"
- Click the "Draw Separator" button to enter drawing mode
- Click on the image to set the start point, then press and drag to adjust the end point position, release to complete. The system automatically extends the line to the image edges
- Repeat step 3 to draw all needed separator lines
- To delete a line, tap to select it and press Delete key or click the "Delete" button in the toolbar
- When done, click "Start Processing"
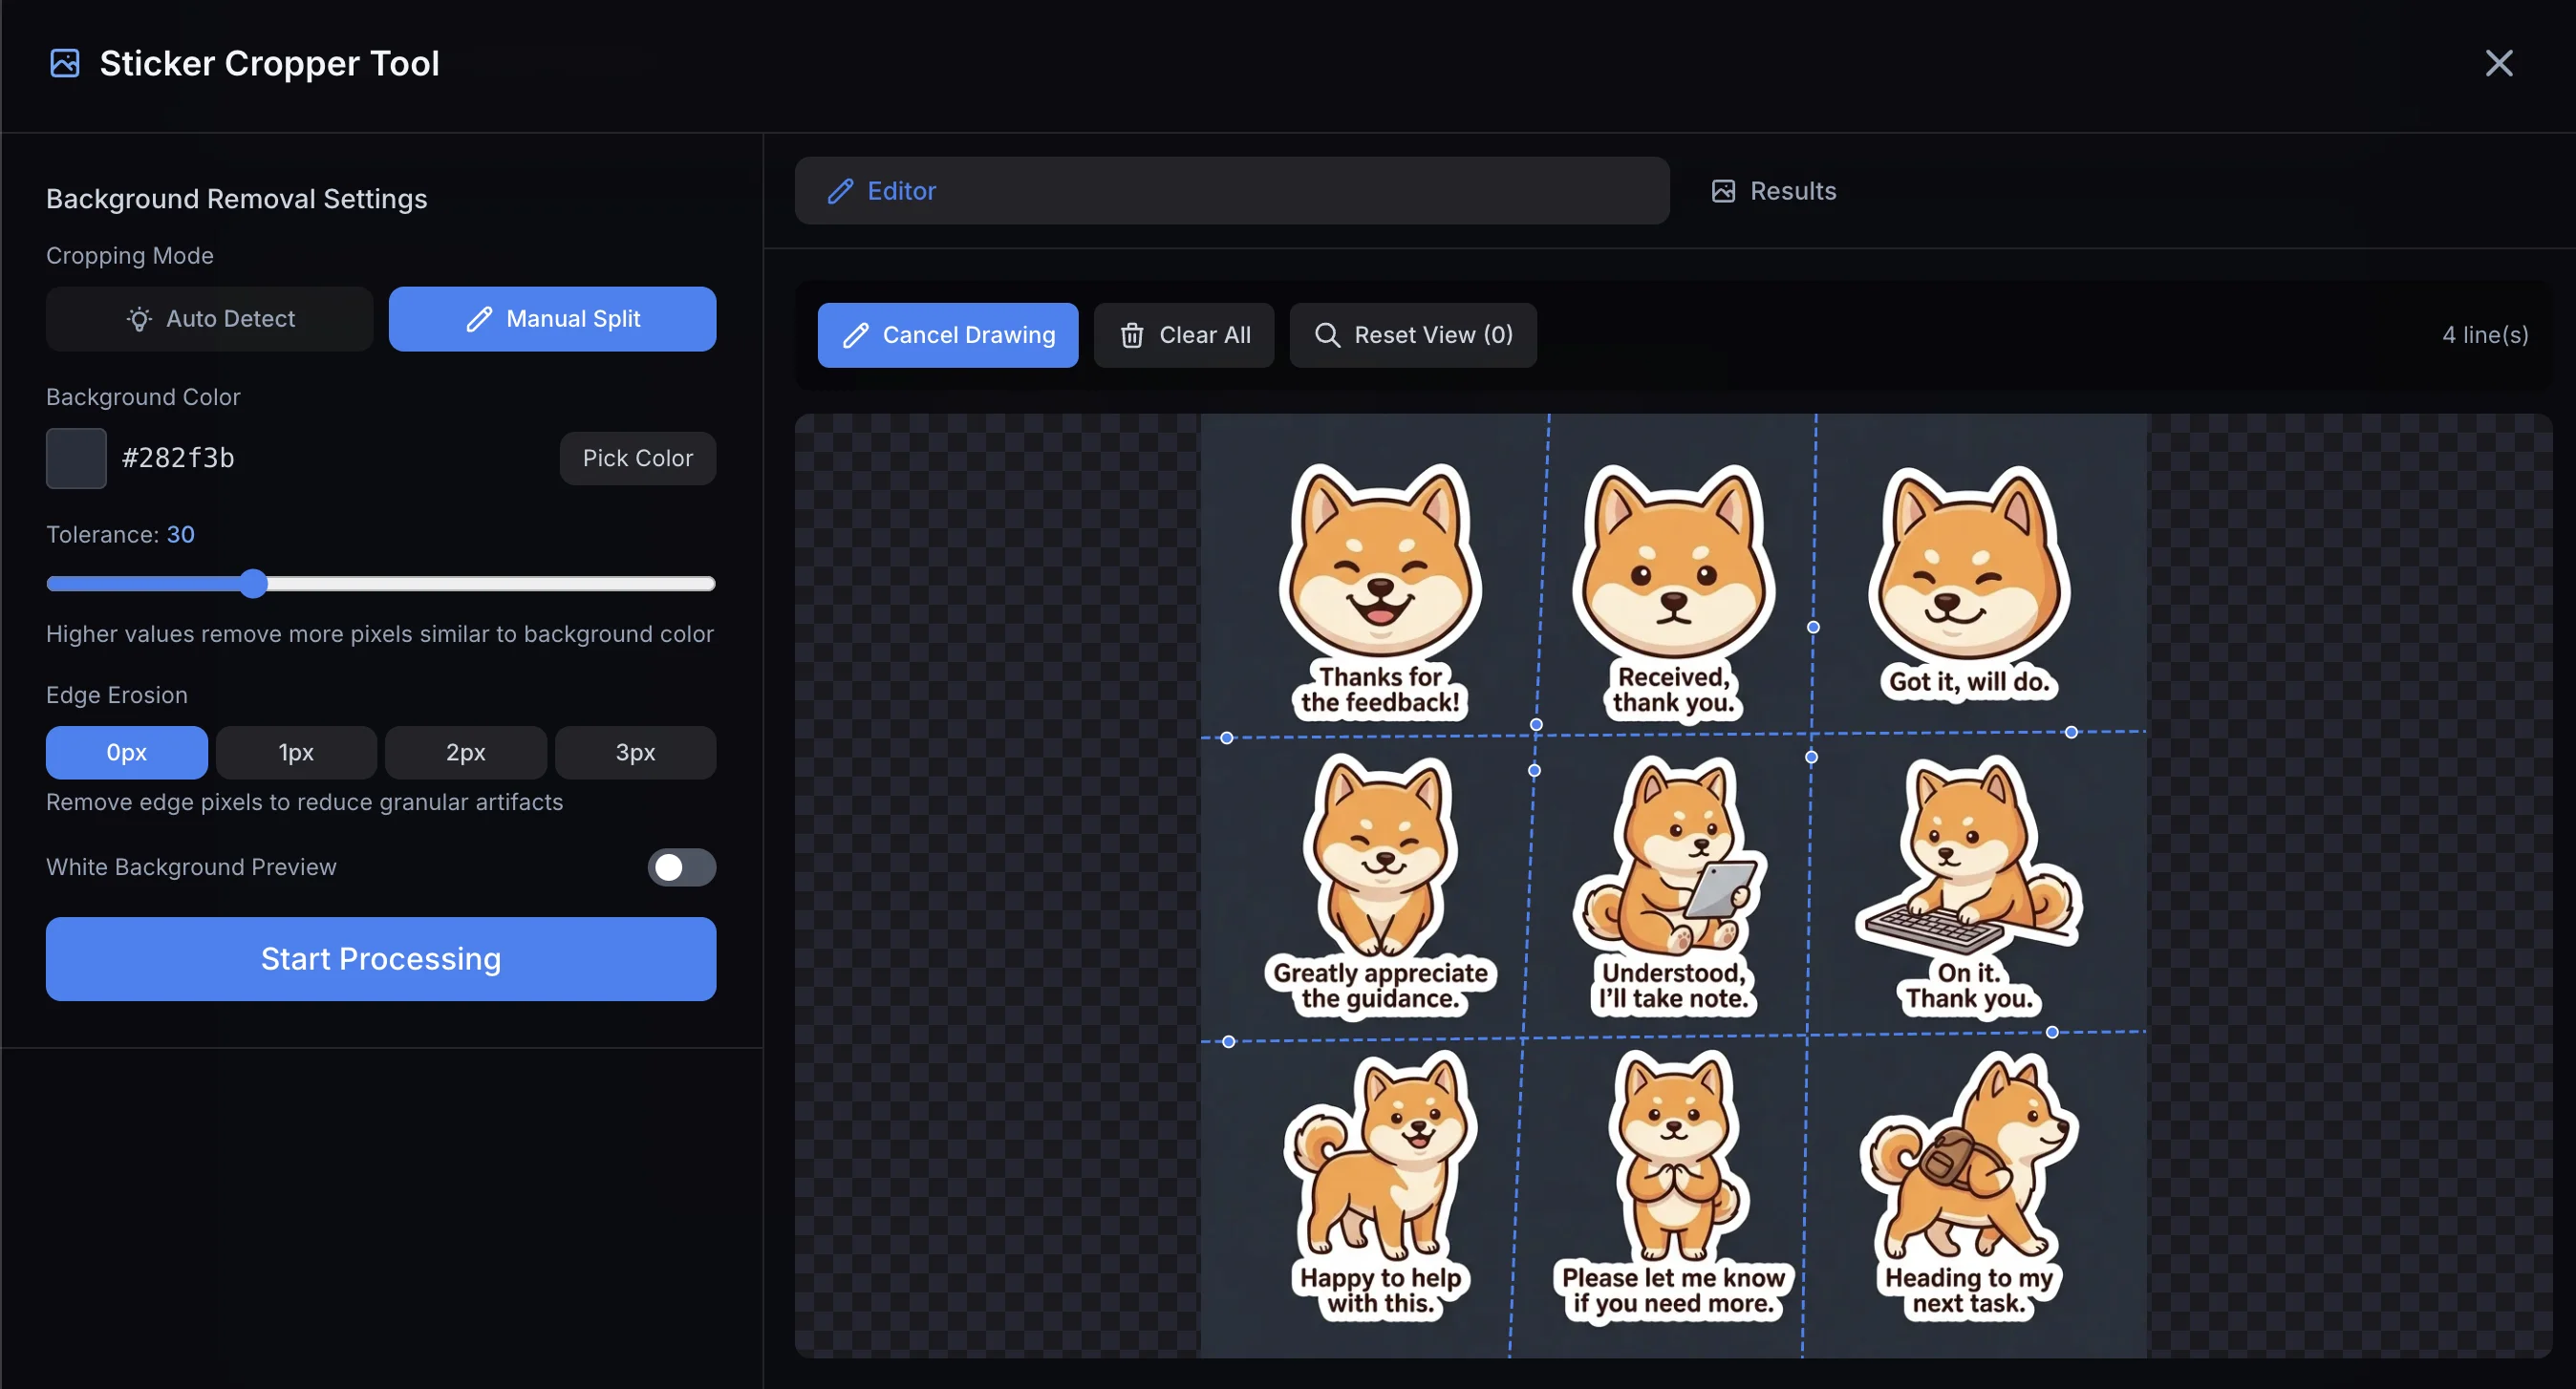
Tip
The number of separator lines determines the final sticker count. For example, drawing 2 horizontal and 2 vertical lines will divide the image into 3×3 = 9 regions.
Processing Results
After processing completes, the view automatically switches to the "Results" tab, showing all cropped stickers.
In manual mode, the "Tolerance" setting for background removal only affects the background removal quality — it does not affect region detection. Regions are determined solely by the separator lines you draw.
Keyboard Shortcuts
| Key | Function |
|---|---|
0 | Reset view zoom |
Escape | Cancel the current line being drawn |
Delete / Backspace | Delete the selected line |
Batch Download
After splitting, you can:
- Download individual stickers
- Batch download all (ZIP archive)
- Download as transparent PNG
LINE Sticker Tool
If you want to publish your stickers on LINE Creators Market, use the built-in LINE Sticker Tool to quickly resize and format your stickers to meet LINE's specifications.
Accessing the Tool
In the Sticker mode main screen, you'll see a green "LINE Sticker Tool" entry:
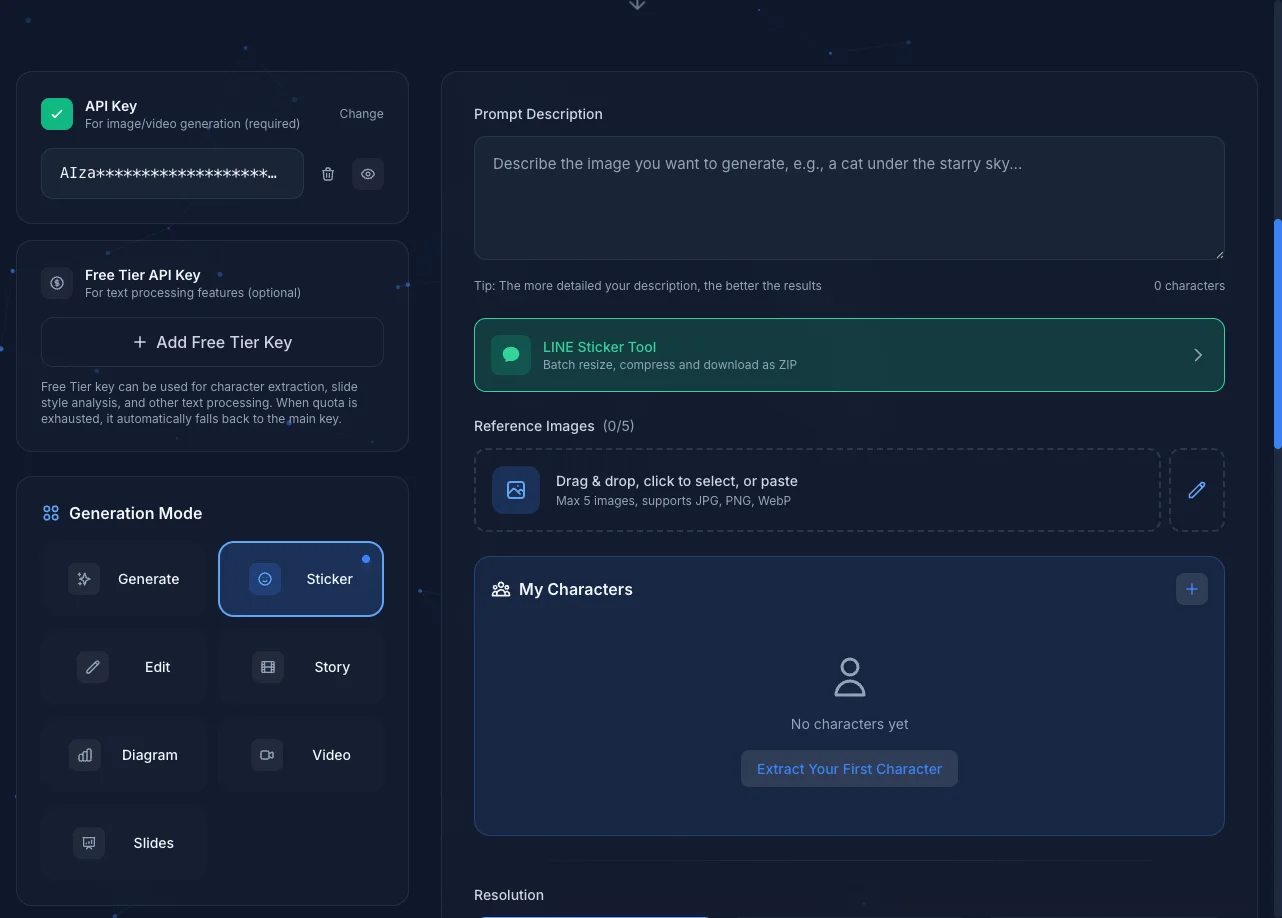
Click to enter the LINE Sticker Tool page.
Features
- Batch Resize: Automatically resize stickers to LINE's required dimensions (max 370×320 pixels, even dimensions required)
- File Compression: Ensure each sticker meets LINE's file size limits
- One-Click Download: Package all processed stickers into a ZIP archive
How to Use
- Drag or upload your cropped stickers to the tool
- The system automatically handles resizing and compression
- Click download to get your LINE-ready sticker pack
Tip
For detailed LINE sticker specifications and submission guidelines, refer to the LINE Creators Market Official Guide.
Next Steps
- Edit Mode - Edit generated stickers
- Character Library - Save characters for consistency